|
|
|
|
|
|
|
- Build a WinFPT project for a Gould-SEL simulator program
- Convert the program to run under Win32, changing DATAPOOL to a
standard Fortran COMMON block
- Set up a shared memory interface for the DATAPOOL and for shared
global COMMON blocks
- Build an interactive controller for the program. This accesses the
variables in the shared COMMON blocks by name at run time, in the
same way as the DATAPOOL access tools available on the Gould-SEL.
Note: If you are looking for a worked example of COMMON blocks shared between
programs under Win32, or if your projects do not behave as described in the tutorial, you
will find the completed working code in the WinFPT distribution, in the directory structure:
...\SimCon\WinFPT\examples\fly_db_completed\... or .../fpt/examples/fly_db_completed/
|
| |
|
|
FLY_DB is a tool used on a helicopter simulator. The simulator has a cockpit with a motion
system, and visual displays of landscapes, airfields and ships. The simulator is controlled by a
Gould-SEL (Encore) RSX system, and the visual system is an IMAGE 600 computer. The
helicopter models run on the Gould-SEL, and communicate through shared memory with auxiliary
tasks, which in turn interface with the cockpit controls and the visual system.
FLY_DB is a tool to examine the visual databases. It flies around a database in the same way as
the simulated helicopter, and enables the user to see the same views that the pilot would see
through the cockpit windows. FLY_DB does not use the cockpit controls. It uses a set of "finger
controls" mounted on the simulator control desk, and the control desk has display screens which
show the views from the cockpit windows.
FLY_DB is not a helicopter model. The controls move
the helicopter in a very simple way, and it is easy to hover motionless, and to turn the vehicle in
order to examine parts of the visual scene in detail.
The simulator is to be re-hosted on a PC running Win32. FLY_DB must be migrated to the new
host.
FLY_DB is made up of 2 files:
|
F.FLY_DB |
which is copied to the PC as |
FLY_DB.F |
Main program |
|
F.FLY_FR |
|
FLY_FR.F |
Executes one frame |
If you installed WinFPT in the default location under
C:\Program Files
you will find them in the folder:
C:\Program Files\SimCon\WinFPT\examples\fly_db_migration\original_source
If you installed WinFPT elsewhere, please use the corresponding directories in your installation
as you follow this tutorial.
Gould-SEL Fortran has several unusual language extensions. This is a sample of the code:
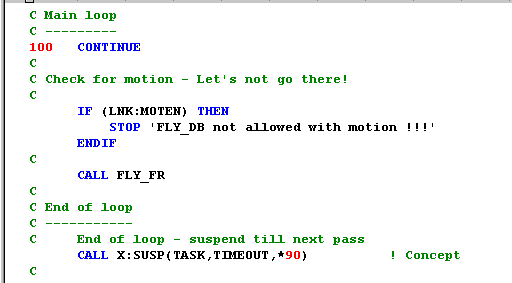
The most obvious non-standard feature is that colon has been used as an alphabetic character in
variable and subroutine names.
|
|
|
The steps in any migration project are:
Decide how the migrated system will be tested.
Set up a test procedure and run it on the original host.
Capture output from the test for comparison with the migrated code.
Make a WinFPT project for the system. We will use WinFPT:
to analyse the code;
to make systematic changes for migration.
Carry out a Q.A. audit. If any significant errors are found:
correct them on the original host;
re-test and re-capture output for regression testing.
Errors are much less portable than correct code!
Find out what systematic changes need to be made to the code.
Identify the changes which will be made by FPT.
Identify any system services which must be emulated.
Make any manual systematic changes which should not affect performance on the original host.
Use FPT to make any changes which may be made on the original host
Encapsulate system services.
Re-test.
Make all of the remaining changes.
Supply any emulated routines.
Build and test on the new host.
In this project, we have two additional steps:
Set up an interactive controller to accesse the DATAPOOL variables at run-time.
Set up a shared memory environment for communication with other programs.
|
|
|
FLY_DB is a very simple program. To test it, we specify start values for the controls, wait a
known time, and look to see where it has gone in the database, and which way it is facing. The
simulator has an interactive handler, named PRISM, which sets or examines DATAPOOL
variables and we use this to control FLY_DB on the Gould-SEL. We set:
| Control |
Variable names |
| Collective - here, effectively a speed control |
DSK:COLL |
| Cyclic - used to control attitude |
DSK:CYLO and DSK:CYLA |
| Pedals - used to turn the vehicle |
DSK:PED |
We wait a known time, say 30 seconds, and then measure the vehicle position and attitude:
| Coordinate |
Variable names |
| Horizontal position and height |
X, Y and H |
| Attitude: roll, pitch and yaw |
PHI, THETA and PSI |
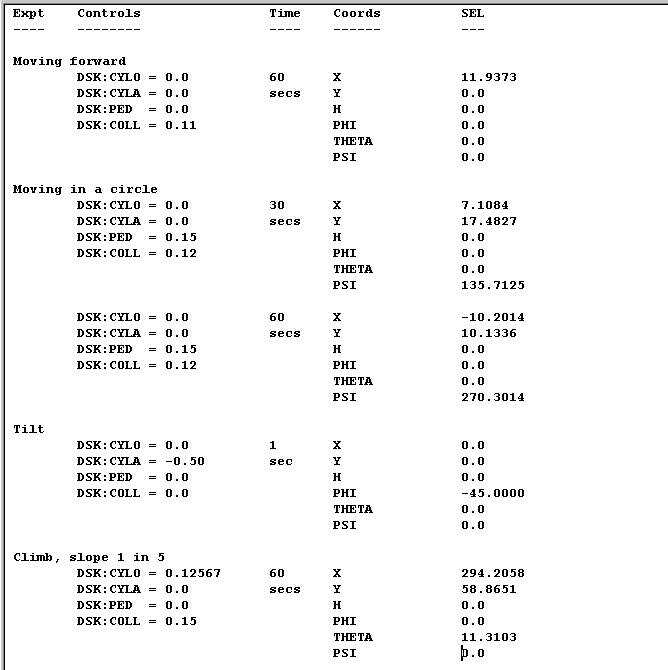
The following table shows a set of test results. FLY_DB always started at X = Y = H = 0.0, and
PHI = THETA = PSI = 0.0. Timing on the Gould-SEL was simply made with a stop-watch. The
FLY_DB program doesn't have a built-in timing mechanism, so the final coordinates are not
precise values. The speed, controlled by DSK:COLL, was therefore always set to a low value.
|
|
|
If you are doing this for the first time it is simplest to use the project wizard. If WinFPT is already
running, select File | Project Wizard from the main menu. If WinFPT is not running, launch it
and the initial screen shows:
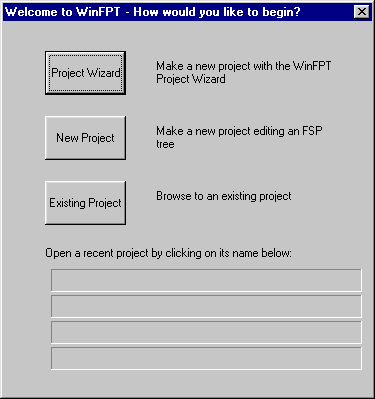
Select the Project Wizard. The Wizard's introductory screen appears.
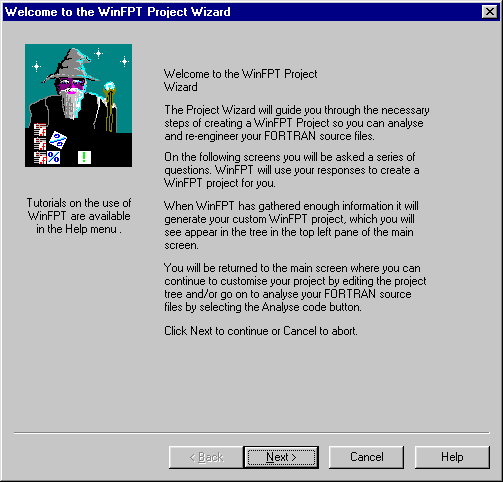
Click on Next. The Wizard asks for a project name and the folder in which you want to work.
Name the project fly_db.fpp and browse to the folder
...\WinFPT\examples\fly_db_migration\fly_db\fpt
This folder is empty when WinFPT is first installed.
Click on Next. The Wizard now asks for the input files. Click on Add Files... and browse to the
source directory,
...\WinFPT\examples\fly_db_migration\original_source
and select the two Fortran files. Click on Next. The Wizard asks where the include files will be
found. FLY_DB doesn't use include files, so accept the default by clicking on Next to continue to
the next screen.
The last Wizard screen asks whether you would like to carry out the analysis at once. Click on
the button No, do not carry out the analysis straight away. This is a Gould-SEL program, and
we need to tell WinFPT about some of the unusual features in the Fortran before we carry out the
analysis. Click on Finish.
The new project appears in the Project tree window in the top left-hand corner of the display.
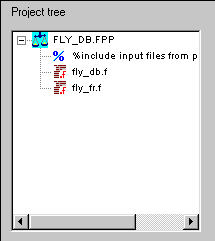
The two Fortran files have the file name extension .F. We need
to tell WinFPT to expect this extension, instead of .FOR which
is the default for Win32. Right-click the project icon at the top of the Project tree, and select
Insert | Directive | Default primary input file name extension....
Specify .F.
Save the project by clicking on the project save button on the toolbar,

or by selecting the menu item File | Save Project.... WinFPT will ask which continuation
character to use - accept the default.
Analysing the Code
We now read and analyse the Fortran code.
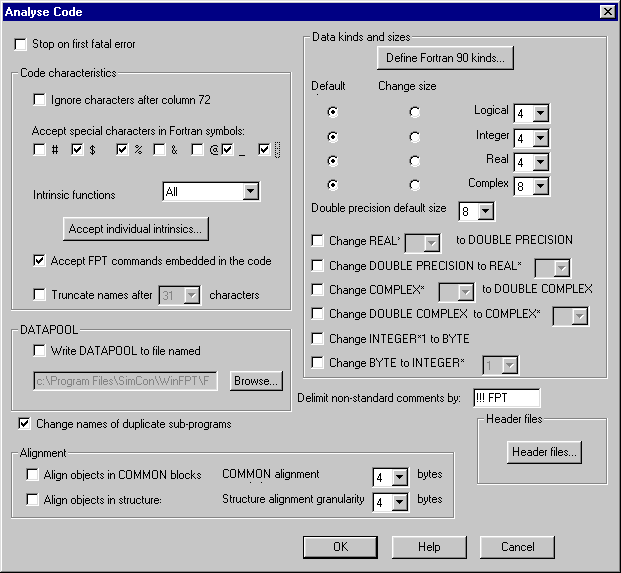
Select the menu item Analysis | Analyse Code.... The Analyse Code dialog opens with a range
of options for the code characteristics. We have already seen that the symbol names contain
colon characters, so check the : (Colon) box in the Accept special characters in Fortran
symbols section. We need to do this before analysis. Otherwise WinFPT will treat colons as if
this were standard Fortran, as delimiter characters only. Launch the analysis by clicking on the
OK button.
WinFPT reads and analyses the code. It builds the program call-tree in the Call tree window.
Any error messages and warnings about the analysis are written to the Report view at the bottom
of the screen. The messages are colour-coded. Errors are red, warnings are orange and
informational notes are green. Scroll up to the top of the report window. This first analysis of
FLY_DB generates two notes, one warning and four errors:

Undeclared Variables
The errors are all undeclared variables. Double-click the first error message in the report window
and the code window displays the program code where the error was detected. The variable
PED_SCALE is undeclared. To see what has happened, open the symbol table by clicking on
the symbol table button on the toolbar:

or by selecting the menu item Tools | Symbol Table. Scroll down to the variable PED_SCALE.
Note that the data type is ERROR, because IMPLICIT NONE has been specified and there is no
declaration. But there is another variable named PED_SCAL which is correctly declared as a
REAL*4.

This program compiles without errors on the Gould-SEL system. The problem is that Gould-SEL
Fortran only uses the first 8 characters of a variable name to identify the variable. The name can
be longer, but characters after the eighth are ignored. PED_SCALE and PED_SCAL are the
same variable.
WinFPT can truncate the names in the same way as the Gould-SEL. It uses only a specified
number of characters to identify the name, but when WinFPT re-writes the code it always uses
the same spelling for each occurrence of the variable. The spelling used is the first spelling
encountered. It will automatically use, for example, the spelling PED_SCAL for all occurrences of
PED_SCAL or PED_SCALE. The code will then compile on other Fortran systems.
To truncate the names we need to re-run the analysis. Close the symbol table and click on the
Stop analysis button on the main toolbar or select the menu item Analysis | Stop Analysis. Do
not write the Fortran files at this stage:

Restart the analysis by selecting Analysis | Analyse Code. Check the box Truncate names
after and select 8 characters. Click on OK to complete the analysis.
The undeclared variables have disappeared. There is still a warning that the COMMON block
DATAPOOL is of different sizes in the two subroutines.
DATAPOOL
The Gould-SEL DATAPOOL is not organised in the same way as a standard Fortran COMMON
block. In a Fortran COMMON block, the variables in the COMMON occupy memory locations,
one after another, in the order in which they are declared in COMMON statements in the code. In
DATAPOOL, the memory locations are stored in a database on the host system. Each sub-program
declares the DATAPOOL variables which it uses, but the variable addresses are not
necessarily consecutive or in the order in which they are declared. There is usually one
DATAPOOL for the system, which is shared by all of the active programs. The DATAPOOL
shared memory is used to communicate data between the programs. There is no construct in
Compaq Visual Fortran (CVF), in Salford FTN95 or any other widely used Win32 Fortran system
which corresponds to DATAPOOL.
WinFPT can convert DATAPOOL to a standard COMMON block. To do this, it needs to know the
layout of the DATAPOOL on the original host system. Gould-SEL systems can produce listings
of the DATAPOOL variables. The file
...\WinFPT\examples\fly_db_migration\original_source\datapool.dat
is a listing in one of the formats which WinFPT can read. The original DATAPOOL contains
about 4000 names, but for the purposes of the tutorial we have extracted only the names which
FLY_DB uses.
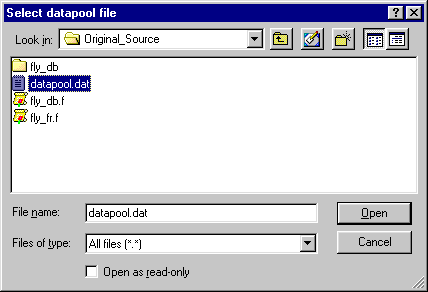
To analyse the code with the correct DATAPOOL layout, we need to specify the DATAPOOL file
in the Project tree. Right-click the project icon in the tree, and in the resulting pop-up menu select
Insert | Directive | Datapool input file .... Browse to the DATAPOOL listing file and select it as
shown below:
This changes the project tree, so the original analysis is no longer valid. WinFPT displays the
message:

WinFPT has recorded all of the changes which you have made, so you can re-run the analysis by
clicking on the Analyse button on the main toolbar.

Save the project by clicking on the Save project toolbar button:

At any time you can now exit from WinFPT and restart the project, either by double-clicking the
project file, or by launching WinFPT and selecting the project from the recent project list.
|
|
|
We have now read the code with very much the same interpretation as the Gould-SEL compiler.
Before we attempt to migrate it to Win32, it is very important to check for errors. Errors are
usually much less portable than correct code because the symptoms of the errors will differ in
different Fortran environments.
WinFPT only reports two informational notes on analysis:

The second of these, "References are made to sub-programs which have not been read", relates
to the Gould-SEL system services X:ID and X:SUSP. We will need to deal with these when the
code is migrated, but their usage here is correct. The first note is "Fortran Auxiliary
keyword(s) used as identifier(s)". These are unlikely to cause a problem, but it is
worth checking what they are. Select Report | Keywords Used for Symbols from the main
menu. The report window shows:

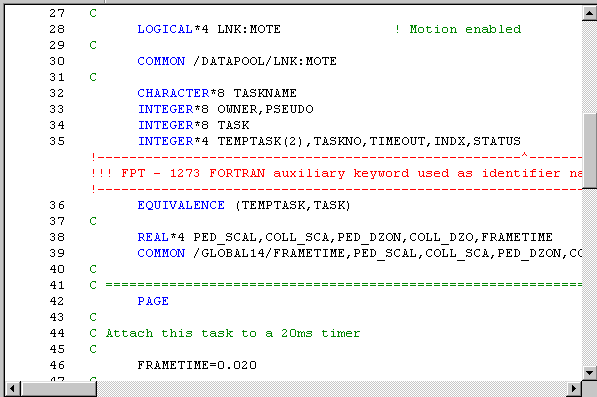
Apparently the keyword STATUS is used for a variable in the FLY_DB main program. Double-
click FLY_DB in the call tree window. The code is displayed in the code window. The keyword
used for a symbol is marked by a red diagnostic. Scroll down the code window and you should
see it. There really is a variable called STATUS, and the usage is harmless.
We now carry out a full Q.A. audit.
The first tutorial, A first WinFPT Project: Q.A. Analysis,
describes Q.A. auditing with WinFPT. The procedure for FLY_DB is described below, but if you are
already familiar with it you may wish to skip this section and go directly to Identifying the Changes
Required to Migrate the Code below. There are no significant Q.A. problems in FLY_DB.
Select Check | Alignment in the main menu. The check made is for variables at addresses in
COMMON blocks which are not exact multiples of their data sizes, or of the system alignment
granularity in the case of CHARACTER variables. The results are written in the report window.
In this case WinFPT reports no problems.
Select Check | Arguments .... This checks for arguments passed to sub-programs which do not
match the intent (input or output), the data types, data sizes or array bounds of the corresponding
formal arguments in the sub-program code. WinFPT displays a dialog box which enables you to
set filters for the check. Accept the defaults. Again, there are no problems.
Select Check | Data in COMMON. This checks for COMMON blocks which are initialised by
DATA statements or embedded data in two or more different sub-programs, or which are
initialised outside BLOCK DATA. Initialisation of a COMMON block in two different routines
causes problems in most Unix and Win32 systems. Initialisation outside BLOCK DATA is an
extension to the Fortran standard and may not be portable. WinFPT reports no problems.
Structures and derived types are not supported in Gould-SEL Fortran, so there is no point in
running the analysis Check | Data in Structures.
Select Check | Data Types. This checks for non-standard uses of data types, for example, the
use of integer variables as if they were logical. No inconsistencies are reported in FLY_DB.
Select Check | Equivalences .... Equivalenced variables occupy the same memory locations.
WinFPT checks for variables of different data types or sizes which are equivalenced together
(mixed equivalence) and for variables which occupy the same memory because of COMMON
declarations, but which are not explicitly equivalenced together (implied equivalence). Mixed
equivalence is often non-portable and either mixed or implied equivalence may be symptoms of
errors. WinFPT displays a dialog box, asking whether the defaulting of data sizes should be
taken into account. Accept the default.
WinFPT reports three anomalies in equivalences in FLY_DB. The first two are mixed and implied
equivalences involving the array DP_BYTE:
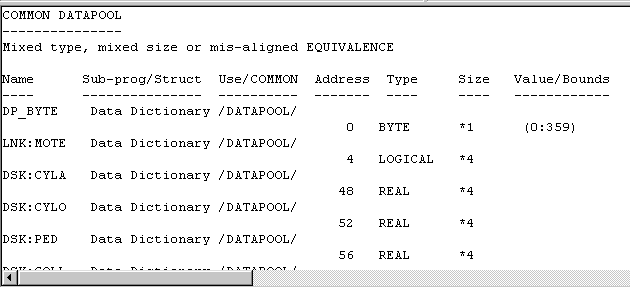
DP_BYTE is an array of bytes which is constructed by WinFPT as a backbone which is used to
organise the DATAPOOL. The array is not declared explicitly in the code unless the DATAPOOL
is converted to a standard COMMON block, and we have not done this yet. The usage is
therefore both a mixed and an implied equivalence. However, it is intentional and will not cause a
problem.
The third anomaly is the mixed equivalence:

This is a deliberate device used in task handling on the Gould-SEL system. It is not an error, but
we will need to deal with it when we come to migrate the code.
Select Check | Names ... in the main menu. This is a check that variables with the same names
in different sub-programs have the same attributes. For example, that they have the same data
types or occupy the same COMMON block addresses. WinFPT displays a dialog box for
selecting filters to the check. Accept the defaults. No problems are reported.
Select Check | Program Flow. This check looks for sections of code which cannot be reached.
None are reported.
Select Check | Usage. WinFPT checks for variables which are read but never written, written but
never read, or declared but never used.
WinFPT reports 5 variables which are read but never written to:
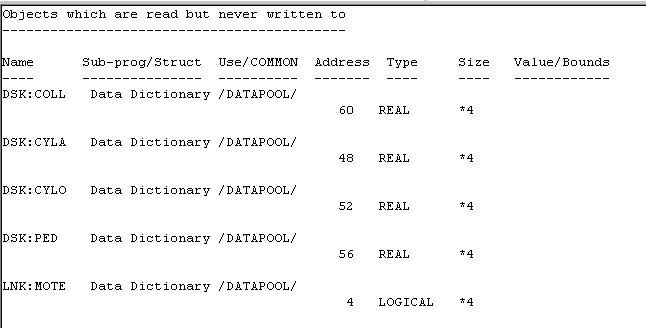
These are all DATAPOOL variables. The DATAPOOL is shared by all programs running on the
system, and these variables are set up by the linkage task, which interfaces to the external
hardware.
Similarly, 4 objects are written to but never read. Two of these, P and Q are DATAPOOL
variables which are outputs to the visual system. TEMPTASK is written to in order to set up the
equivalenced variable TASK.
The use of PSI_P is a genuine but harmless error. It was originally set up in the same way as
PHI_P and THETA_P in order to provide the visual system with the angular rates. It became
redundant when the program was modified to drive the yaw rate, not the yaw angle from the
pedals.
We conclude that there are no serious problems in the code.
|
|
|
System Services - Emulating the 20msec Timer
We need to know which MPX system services are called by FLY_DB. We will need to emulate
them. We also need to check that the code is complete - that there are no other missing
subroutines or functions.
Select Report | Unresolved Sub-program References in the main WinFPT menu. The report
window displays:

The code is complete except for the two system services.
X:SUSP suspends the Gould-SEL task until the next clock interrupt. FLY_DB is attached to a 20
msec timer, so the task is suspended until the next 20 msec time step. The Win32 routine
waitmsec(n) has been written to wait until the end of the next n msec time step, and we will
emulate X:SUSP by calling it.
X:ID returns the task ID on the Gould-SEL. This is only used by X:SUSP, and is not needed by
the emulation routine, so X:ID can now become a dummy. The emulated routines are in
...\WinFPT\examples\fly_db_migration\win32_emulations
Test Compilations
To see the kind of migration problems we will have to deal with, it is worth attempting to compile
FLY_DB "as is". There is a Microsoft Developer Studio and Compaq Visual Fortran (CVF) project
in the directory:
...\WinFPT\examples\fly_db_migration\original_source\fly_db
If you use Developer Studio and CVF, start the project and select the menu item Build | Rebuild
All you should see something like:
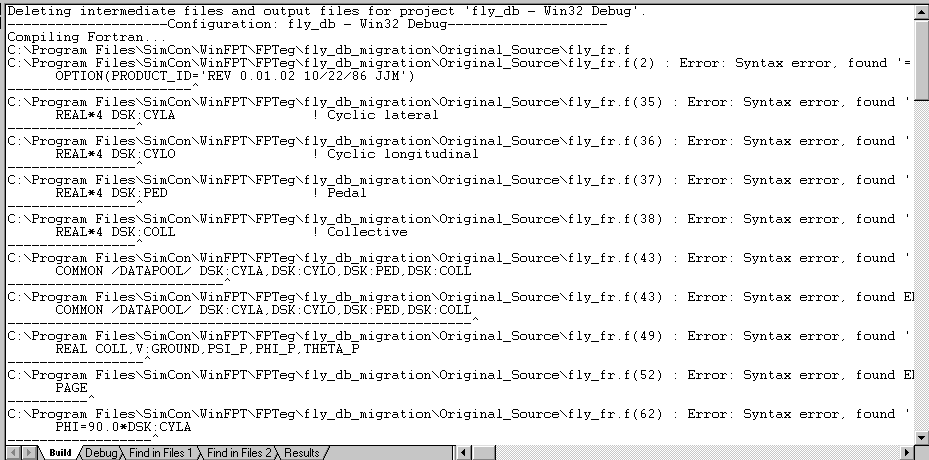
Very reasonably, CVF doesn't seem to like colon characters in variable names, as for example, in
LNK:MOTEN. It also will not accept the Gould-SEL OPTION and PAGE statements, and
the version of CVF available at the time of this migration did not accept declarations of the type INTEGER*8.
If you use Salford FTN95, the command "> ftn95 *.f" shows a similar pattern of errors:
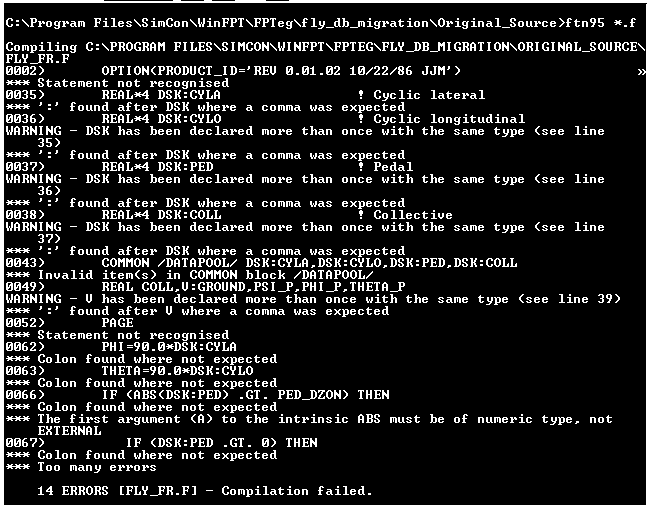
The changes to the code which we need to make are therefore:
- Replace colon characters in variable names and other symbols.
- Handle unsupported keywords and declarations such as OPTION, PAGE and INTEGER*8.
- Convert DATAPOOL to a standard Fortran COMMON block, where the address information
is set out in the COMMON block declarations.
|
|
|
The migration changes which should not affect the behaviour on the Gould-SEL are the removal
of the keywords PAGE and OPTION. The keyword PAGE only controls the format of the list file.
It is non-standard, and does not change the generated code. OPTION is also non-standard (The
standard keyword is OPTIONS) and is only used here to specify the program ID. Note that we
cannot remove the colon characters because some of the names are in the system DATAPOOL.
These are small changes, but it is important to make this step because WinFPT will completely
re-write the Fortran code, and we would like to make the Gould-SEL and the Win32 versions of
the program as similar as possible.
Click on the Software Engineering button on the main toolbar:

or select the menu item Tools | Software Engineering. The Software Engineering dialog
appears. Select the Migration tab and check the boxes Comment out OPTIONS and Comment
out PAGE.
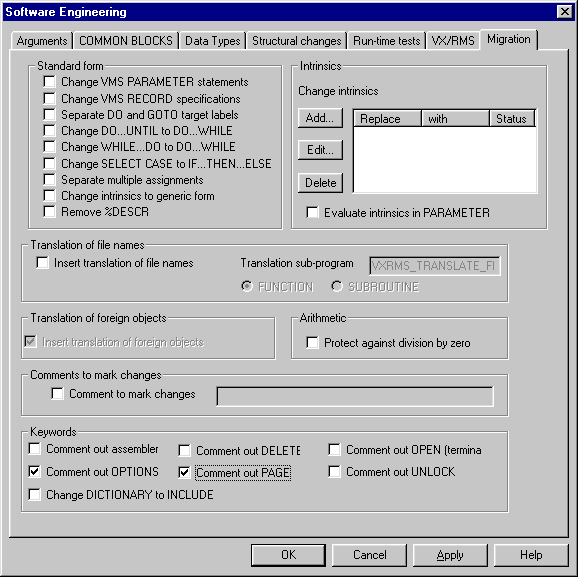
Click on OK. Double-click FLY_DB.F in the project window to display the code, and you will see
that the OPTION statement has now been commented-out.

This code will be built on the Gould-SEL. We must make sure that it is written with all names,
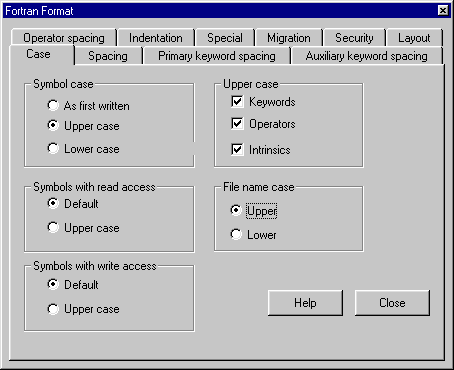
keywords and file names in upper case, that there are no tab characters anywhere, and that the
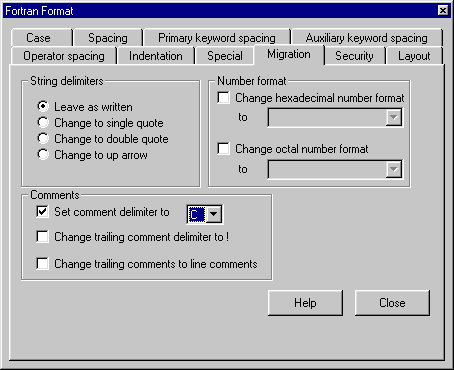
line comment delimiter is never !, which the Gould-SEL does not
accept (By default, WinFPT adds a header to each file delimited by !
characters).
Click on the Format code button on the main toolbar.

or select the menu item Tools | Format Fortran Code. Use the Layout, Case,
Spacing and Migration tabs to set the required format. In the Case tab you need to
specify:
In the Spacing tab specifiy Change embedded tabs to spaces and in Migration specify Set
comment delimiter to | C. For example:
We now output the code for re-testing on the Gould-SEL. Click on the Write Fortran toolbar
button:

or select the menu item Tools | Write Fortran. Check the button Overwrite CHANGED files,
set the primary output file name extension to be .F and use the
Primary output directory browser to write the files to
...\WinFPT\examples\fly_db_migration\Gould-SEL_test
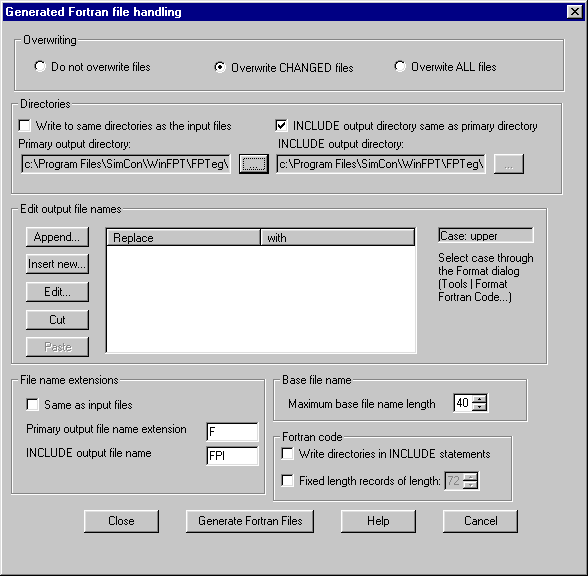
Click on the button Generate Fortran Files. The files will be written. The program builds and
runs on the Gould-SEL in exactly the same way as the original.
|
|
|
The Emulated System Routines
We add the emulated system service routines to the WinFPT project.
Right-click FLY_FR.F in the Project tree. Select Add after | Source files ... in the resulting
pop-up menu. Browse to
...\WinFPT\examples\fly_db_migration\Win32_emulations
and select the three Fortran files. The current analysis is now out of date and WinFPT cancels it.
Analyse the project again by clicking on the Analyse toolbar button.

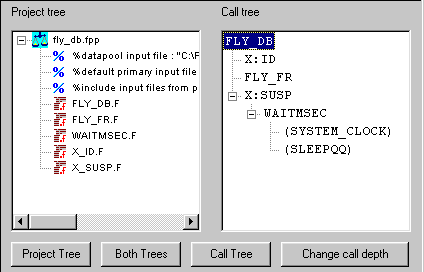
The Project tree and Call tree are now as shown below.
Replacing the Colon Characters
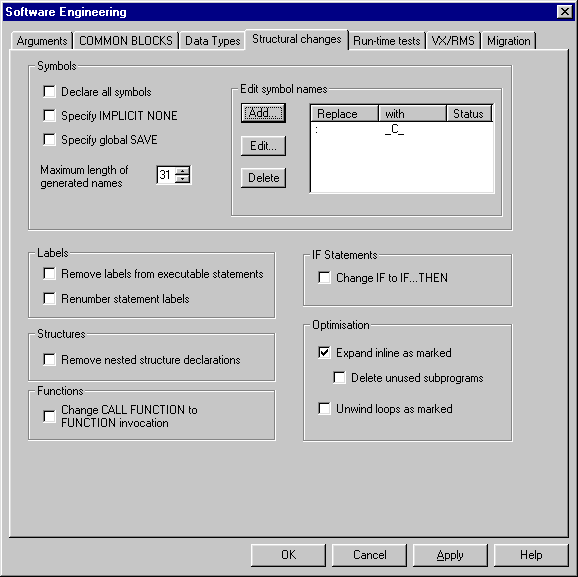
Click on the Software Engineering button and select the Structural changes tab. In the Edit
symbol names panel, click on Add. Enter the string to be replaced as : and the replacement as
_C_. The dialog will appear as below. Click on OK.
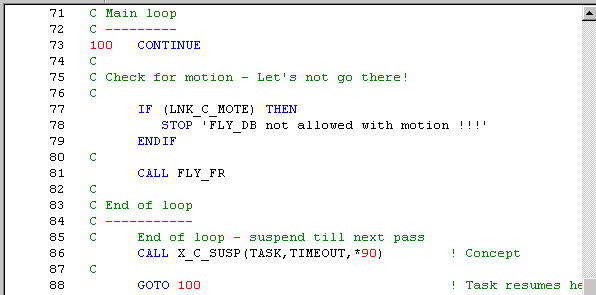
WinFPT systematically edits the names of all user-defined symbols. Note that it does not change
colon characters in declaration statements or sub-string expressions. The change is language-sensitive.
Double-click FLY_DB.F in the Project tree and scroll down in the code window to see
the changes. For example:
Converting DATAPOOL
WinFPT has used the DATAPOOL listing file to allocate addresses to the DATAPOOL variables,
but so far it has not changed the code. A standard Fortran Compiler will interpret the DATAPOOL
statements in the same way as other COMMON blocks, and the addressing will be wrong. The
simplest way to handle this is to move the COMMON blocks into separate INCLUDE files. This is
good practice, and in any case we will need to do this when we set up the shared memory
access. The COMMON block INCLUDE files will contain complete and unambiguous definitions
of the COMMON blocks, including the DATAPOOL, which will be the same wherever the
COMMON blocks are referenced. WinFPT inserts the necessary INCLUDE statements.
Click on the Software Engineering button and select the COMMON BLOCKS tab. Check Move
COMMON BLOCKS to INCLUDE files and select separate INCLUDE files. Click on OK.
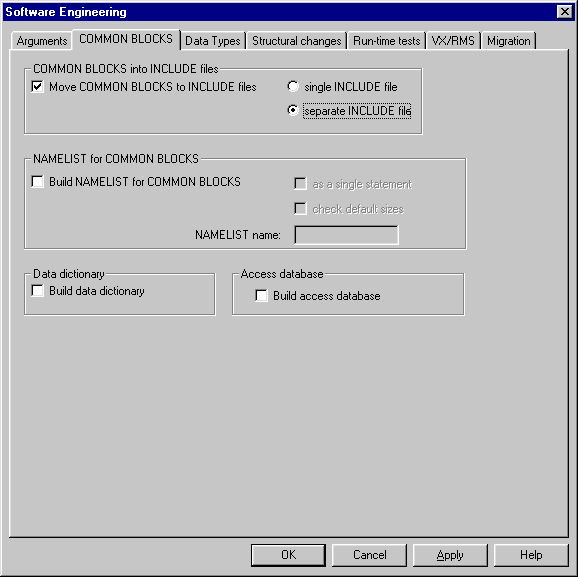
To see the changes WinFPT has made, double-click FLY_DB.F in the Project tree (not the Call
tree). Scroll down, and you will see that the declarations for /DATAPOOL/ and /GLOBAL14/ have
been removed, and there are INCLUDE statements for the new files.
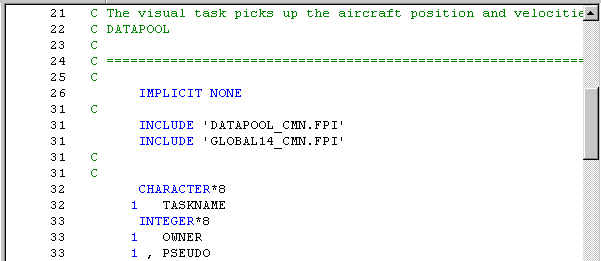
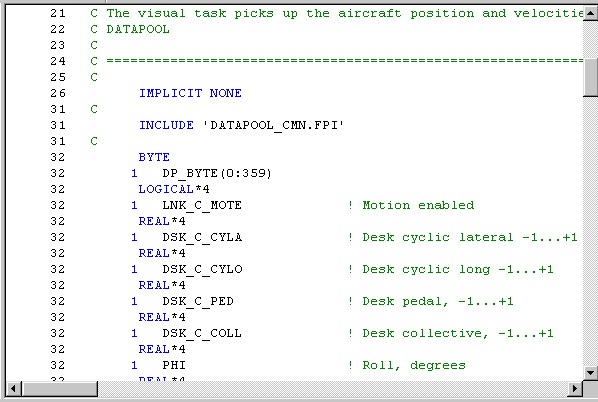
To see the new files, double-click FLY_DB in the Call tree. When code is displayed from the
Project tree, the display shows the files as they will be re-written. When code is displayed from
the Call tree, WinFPT displays the code of the sub-programs, stepping into INCLUDE files. As
you scroll down, the window shows the code generated for the /DATAPOOL/ COMMON and for
/GLOBAL14/.
The INTEGER*8 Variables
The version of CVF used in this migration did not accept INTEGER*8 variables. To see the extent of the problem, click on the Symbol
table button:

Use the Usage filters to display only formal arguments, array and scalar variables. Scroll down
the symbol table. There are only 3 INTEGER*8 variables, OWNER, PSEUDO and TASK.
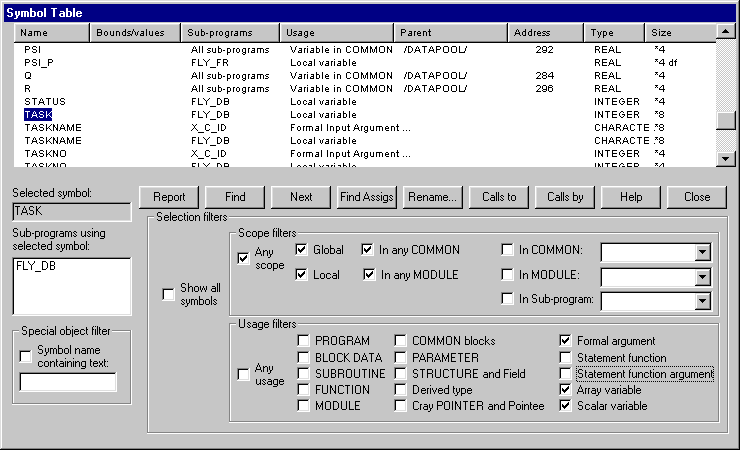
Use the Search scope panel under the Project tree to set the search scope to All files.

Double-click the variables in the symbol table, and use the Find and Next buttons to see the
usage in the code window. The variables are used only as arguments to X:ID and X:SUSP in
handling the 20msec timer. The emulated routines do not use these arguments, so they may
safely be changed to INTEGER*4.
WinFPT can convert all integer variables to a specific data size, but this would be dangerous in
this project because there are byte variables used in organising COMMON blocks. The simplest
procedure is to edit the files affected by hand. A modified version of FLY_DB.F will be found in
the directory:
...\WinFPT\examples\fly_db_migration\modified_source
This is the only file which needs to be changed. There is a comment warning that the file is
modified, and the INTEGER*8 declarations are changed to INTEGER*4.
Change the WinFPT project to use the new file. Select FLY_DB.F in the Project tree and delete
it. WinFPT cancels the current analysis. Select the icon for the last of the directives in the project
tree, right-click and select Add after | Source files.... Browse to the modified file and insert it.
Analyse the code again.
Note that we have made the smallest possible manual change to the source code.
Write the Win32 Build Files
We now write out the Win32 files. Click on the Write Fortran code button on the main toolbar.

The Generated Fortran File Handling dialog appears. Select Overwrite CHANGED files in
case we need to do this again. In the Directories panel browse to
...\WinFPT\examples\fly_db_migration\fly_db\build_fly_db
and check the box INCLUDE output directory same as primary directory. Use the File name
extensions panel to set the primary output file name extension to .F.
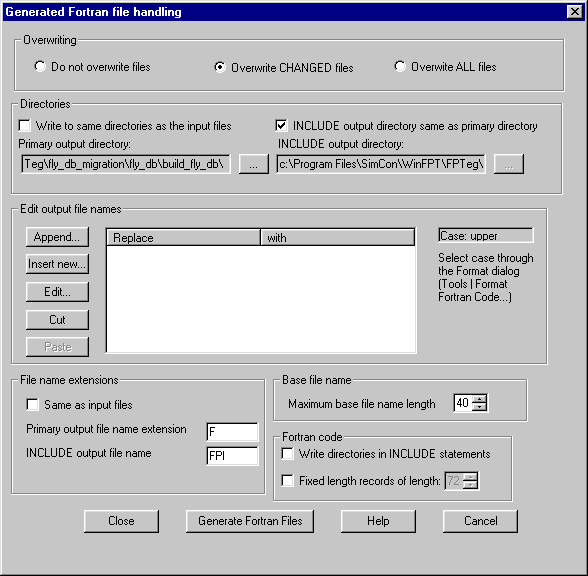
Click on the Generate Fortran Files button. The files are written.
Build FLY_DB for Win32
The directory
...\WinFPT\examples\fly_db_migration\fly_db\build_fly_db\fly_db
contains a Microsoft Developer Studio and Compaq Visual Fortran project for FLY_DB. The
program builds and links without problems. We have migrated it, but so far we have not shared
the COMMON blocks with any other tasks, so there is no way (except for the CVF debugger) to
set up the control variables, DSK:COLL, DSK:CYLO etc. We can't control it.
|
|
|
On the original Gould-SEL RSX there is an interactive program which allows the operator to
examine and change any variable in DATAPOOL at run-time. We need to do the same thing
under Win32.
The program ADX in the WinFPT libraries performs this function. ADX is in the file
...\WinFPT\fpt34\fpt_libs\adx.for
This program is a template. ADX needs INCLUDE statements for the include files which declare
the COMMON blocks which will be accessed interactively. We therefore make a local copy of
adx.for. This has been done, and is in the file:
...\WinFPT\examples\fly_db_migration\adx\original_source\adx.f
The code is shown below. We have included the two COMMON block include files which were
made by WinFPT when we processed FLY_DB.
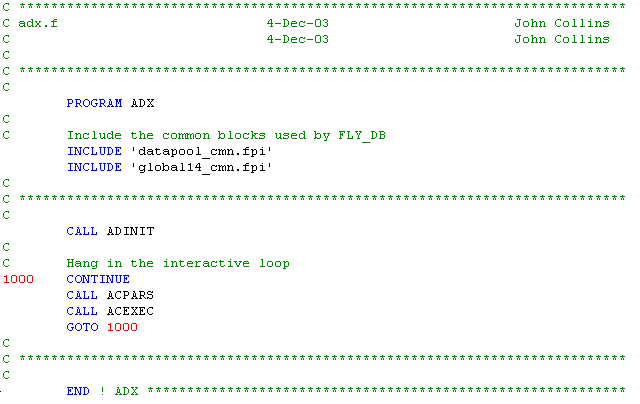
We use WinFPT to build the code for the interactive controller.
Close the WinFPT project for FLY_DB if it is still open, by selecting File | Close Project in the
main menu. WinFPT prompts to save the project. Please do so, but there is no need to write the
Fortran code again.
Use WinFPT to build a new project for ADX. This time we will use the File menu instead of the
Project Wizard (to see how it is done - but the Wizard would work just as well). If you are
re-starting WinFPT, click on the New Project button on the introductory menu. If WinFPT is already
running, select File | New Project in the main menu. Name the project adx.fpp, and write it to
the directory
...\WinFPT\examples\fly_db_migration\adx\fpt
Right-click the project icon in the Project tree, select Insert | Source files... in the resulting
pop-up menu, and insert adx.f from the directory
..\original_source.
We also need to add directives to tell WinFPT where the include files are, and the file name
extensions. Right-click the project icon again, and select Insert | Directive | INCLUDE input
directory.... Browse to
...\WinFPT\examples\fly_db_migration\fly_db\build_fly_db
This is the directory in which we wrote the COMMON block include files when FLY_DB was
processed. WinFPT inserts the "%include input directory" directive into the tree.
Right-click the directive and select Add after | Directive | Default primary input file name
extension.... Specify .f. because we have named the program
file adx.f and not adx.for which would be the default. In the same way, add the directive
INCLUDE file name extension and specify .fpi.
The last step in building the project is to add the commands and libraries used to build the
interactive controller. These are written in a WinFPT specification (FSP) file in the main WinFPT
directory. Right-click the Fortran file adx.f in the Project tree and select Add after | Existing
FSP folder.... Browse to the main WinFPT installation directory,
c:\program files\simcon\WinFPT\fpt34
and select adbserve.fsp. The Project tree now looks like this:
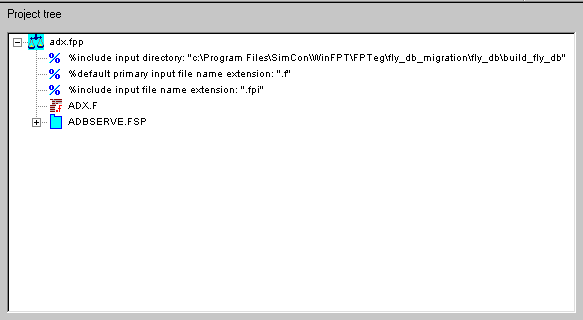
Analyse the project by clicking on the Analyse button on the main toolbar.

The analysis report shows four notes and two warnings. The notes are not significant. The first
warning is that there is a call to the system routine EXIT, which has the same name as a Fortran
90 keyword. This will not cause a problem under CVF or FTN95. The second warning is that a
name collision has occurred between the names used in FLY_DB and those in the WinFPT
adbserve library. When the interactive controller is built, all names in COMMON blocks must be
unique. WinFPT has automatically renamed one of the symbols.
WinFPT has built data tables which describe the layout of our two COMMON blocks. It has also
gathered all of the service routines which set up the interactive command line and command file
handlers which allow the user to change variables at run-time.
Write the Fortran files for the interactive controller
Click on the Write Fortran code button. The Generated Fortran file handling dialog appears.
As before, select Overwrite CHANGED files. In the Directories panel send the output to
...\WinFPT\examples\fly_db_migration\adx\build_adx
Set the primary output file name extension to .F.
Click on the Generate Fortran Files button. The files are written.
The directory
...\WinFPT\examples\fly_db_migration\adx\build_adx\adx
contains a Microsoft Developer Studio and Compaq Visual Fortran project to build ADX. The
code compiles and links without problems. The Debug Run directory is set to:
...\WinFPT\examples\fly_db_migration\run
Run it, by clicking on the Developer Studio ! button and it prompts for
commands with the prompt ACL>. You will find that you can set
and examine the variables in /DATAPOOL/ and in /GLOBAL14/. For example:
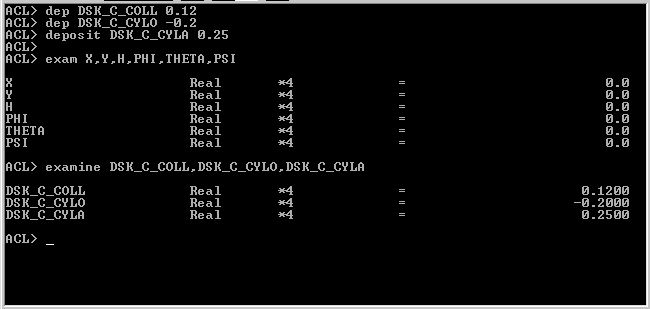
If you enter a question mark to ADX at any point during entry of a command, the system prints
the possible continuations. The interactive environment supports most of the obvious commands
for setting (deposit, poke, let) and for examining (examine, peek, print) variables. It accepts
abbreviated commands.
However, at present the variables you can access are in local copies of the COMMON blocks,
and the values read and written are not communicated to FLY_DB. We still have to set up the
shared memory.
|
|
|
Under Win32 we will set up the shared memory as a memory DLL. There is one last step for
which we use WinFPT. We need to know the sizes of the two shared COMMON blocks. We can
find this from either WinFPT project. Restart the project if you have closed it, analyse, and select
Report | COMMON Blocks in the main menu. The report window shows:
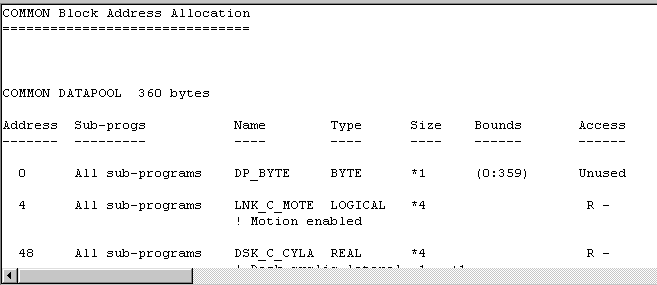
Note the sizes of /DATAPOOL/ and of /GLOBAL14/.
We now create a BLOCK DATA sub-program for these two COMMON blocks. The code is
shown below, and will be found in the file:
...\WinFPT\examples\fly_db_migration\fly_db_commons.f

Note the compiler directives, introduced by !DEC$, which specify
that the COMMON blocks are exported from the DLL. We have found that the COMMON blocks are not exported
from the DLL unless they are actually initialised by data.
The DLL is built by the Developer Studio project in the sub-directory
...\WinFPT\examples\fly_db_migration\fly_db_commons\fly_db_commons
Note that this project builds a Win32 Dynamic Link-Library, not a Fortran Dynamic Link-Library.
Select this option from the File | New | Projects menu in Developer Studio when creating shared
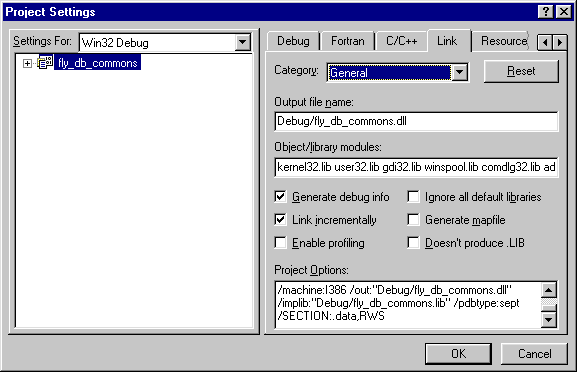
memory DLLs for your applications. One important switch must be added by hand to the Link
command in the Developer Studio project. It is /SECTION:.data,RWS.
If you are making a shared memory project from scratch, open Project | Settings | Link | General
and type it as shown:
Build the DLL. CVF and Developer Studio create the files:
	fly_db_commons.dll
	fly_db_commons.lib
	fly_db_commons.exp
Copy the DLL to the directory
...\WinFPT\examples\fly_db_migration\run
This is the Debug Run directory specified in the Microsoft Developer Studio projects for FLY_DB
and ADX.
Modify the ADX and FLY_DB Developer Studio Projects to use the DLL
We need to add compiler directives to the source codes to instruct CVF and the linker to use the
DLL version of the shared COMMON block. The directive for each COMMON block must
occur in every sub-program which uses the COMMON, and it must NOT occur anywhere
else.
Re-open the ADX Developer Studio project if you have closed it. Use the search facility to locate
the string /datapool/ in the source directory:
...\WinFPT\examples\fly_db_migration\adx\build_adx
It occurs in two files: datapool_cmn.fpi which is the original
include file for the COMMON block, and adx_adc.fpi which was
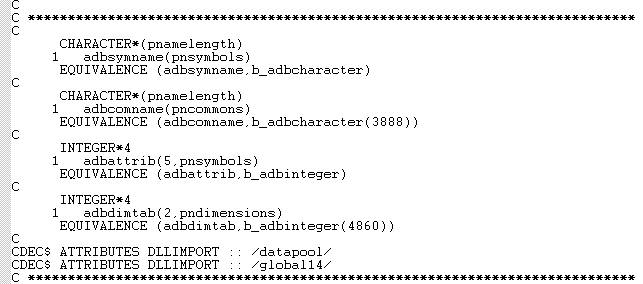
constructed by WinFPT as part of the mechanism for interactive access to the COMMON. Add the directive:
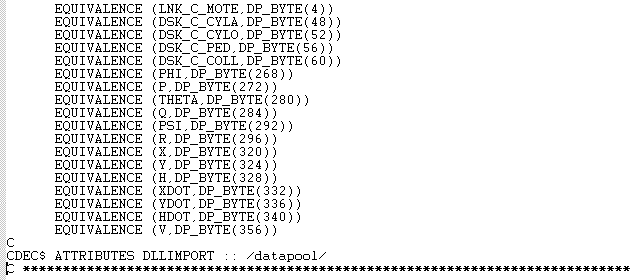
CDEC$ ATTRIBUTES DLLIMPORT :: /datapool/
to both files. Similarly, search for /global14/, which will be found in
global14_cmn.fpi and in adx_cmn.fpi, and add the directive:
CDEC$ ATTRIBUTES DLLIMPORT :: /global14/
to each of these files. The code for adx_adc.fpi, now contains:
The code for datapool_cmn.fpi now contains:
and the code for global14_cmn.fpi contains:

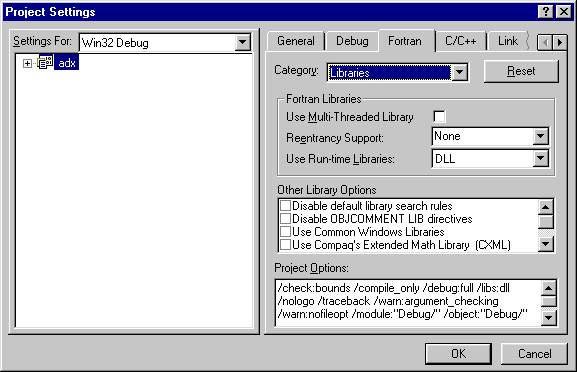
We also need to check the Develoiper Studio project settings to make sure that we use DLL run-time libraries.
Select Project | Settings | Fortran | Libraries | Use run-time libraries | DLL as shown below:
Lastly, add the library file for the DLL, fly_db_commons.lib
to the project. In the Developer Studio main menu, select
Project | Add To Project | Files... | Files of type | Library files (.lib)
and browse to fly_db_commons.lib in
...\WinFPT\examples\fly_db_migration\fly_db_commons\fly_db_commons\debug
Make exactly the same changes in the FLY_DB developer studio project. In this case /datapool/
and /global14/ occur only in the include files datapool_cmn.fpi
and global14_cmn.fpi.
Rebuild both projects.
Running and Testing the Win32 Code
The Developer Studio projects for FLY_DB and ADX have been set up to run in the directory
...\WinFPT\examples\fly_db_migration\run
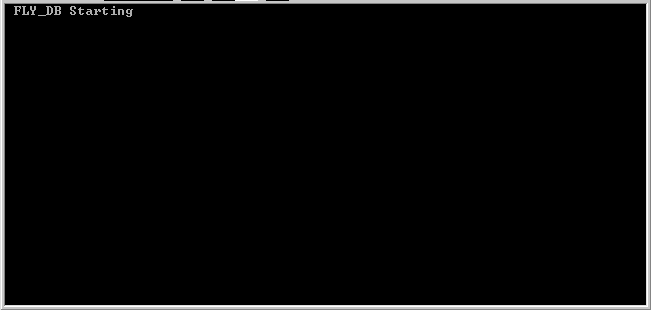
Launch both programs by clicking on the ! toolbar icons. FLY_DB
launches with the message:
FLY_DB should now be running under the control of ADX. Type commands in the ADX window.
Set a value for the collective lever (Essentially a throttle in this program) in the range 0.1 to 1.0
and examine the X coordinate at intervals of a few seconds.
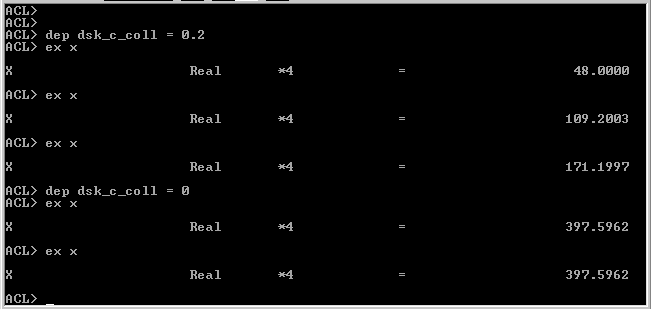
You should have control of your vehicle through shared memory. If you do not, check that both
programs are using the DLL by renaming it in the run directory. When it is renamed, neither of
the programs should run. If either does, something has probably gone wrong in setting up the
DLLIMPORT directives. Compare your files with the files in the directory
...\WinFPT\examples\fly_db_completed\...
We now run the test cases. On the Gould-SEL system, the controls were set by the datapool
inspection program, PRISM, and the commands were typed by hand every time. ADX has a
command file interface, so sequences of commands can be written in files by a text editor and
invoked by calling the command file. Enter the command echo.
This instructs ADX to echo command files to the screen. Command files are invoked by the character
@ (in the same way as
in VMS) and have the default file name extension .int.
The experiments which we ran on the Gould-SEL are programmed in a set of command files in the
...\run directory. Type @reset
to return the vehicle to rest at the centre of the database. Type @p
(for position) to show the current position and attitude.
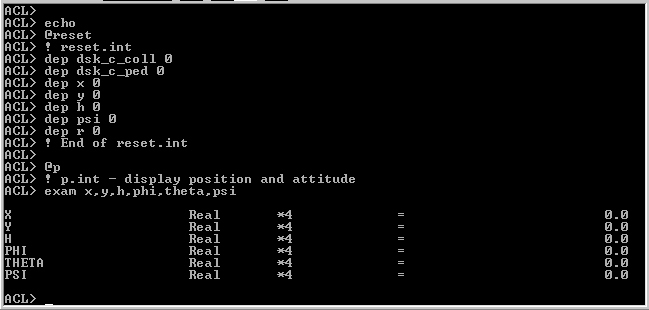
To run our first experiment - "moving forwards", enter @x, and then
@p, typing the carriage return 60 seconds later. The screen shows
something close to
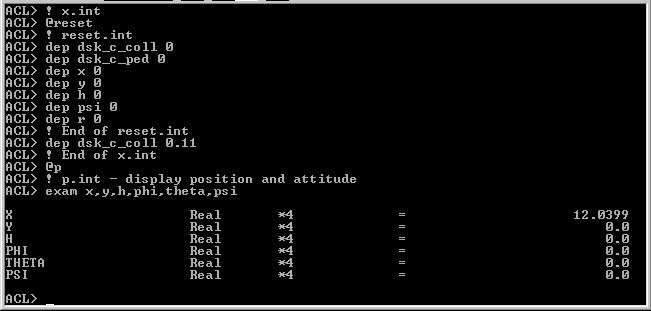
(I used a stop-watch - not very accurate!). We have our first comparative data point - not too bad!

A Sting in the Tail - The Trig Functions
The second experiment, "moving in a circle" is programmed as
circle.int. Again, type @reset
to bring the vehicle back to the centre of the database, then @circle
and enter @p pressing the carriage return after 30 and then 60
seconds. The yaw, PSI, is more or less correct, but the X and Y coordinates are completely wrong.
Similar errors occur wherever the vehicle turns through an angle.
The problem is in the trigonometric intrinsics. CVF, FTN95 and all modern Fortran systems
measure angles in radians. There is an old version of the Gould-SEL math library in which the
trig intrinsics expect or return arguments in degrees. FLY_DB was written to use that library.
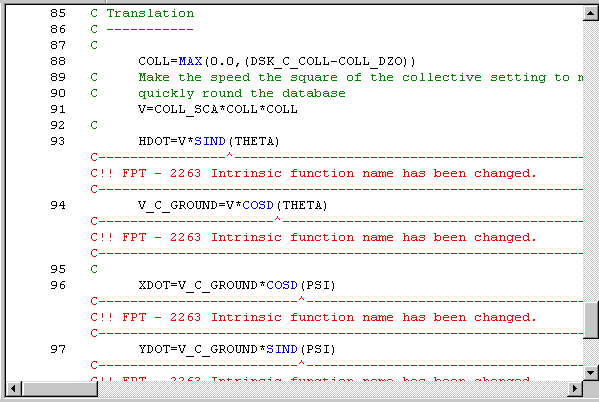
This is not a serious problem. All we need to do is systematically to replace the trig functions
SIN, COS, TAN, ATAN etc. with the corresponding intrinsics which use degrees instead or
radians, SIND, COSD, TAND, ATAND etc. WinFPT can do it automatically. The important point
is that we have made a procedure for migrating the code which we can re-run with modifications
as many times as we like.
Re-run the WinFPT project for FLY_DB. Analyse the code, and then use Software Engineering
| Migration | Change intrinsics to replace the intrinsic function names.
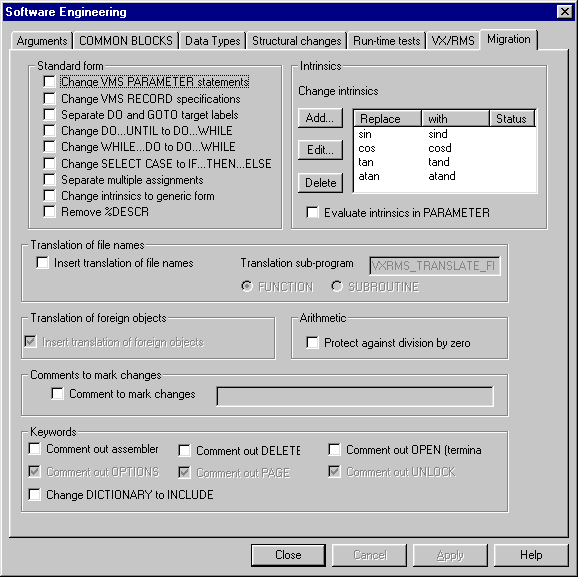
The intrinsics in the code are modified:
Write the code again, and save the project in case something else needs to be added later.
Re-writing the code will overwrite the code modifications which we made to add the DLLIMPORT
directives. Re-open the Developer Studio project and edit in the
CDEC$ ATTRIBUTES DLLIMPORT :: /datapool/
and
CDEC$ ATTRIBUTES DLLIMPORT :: /global14/
directives as before.
Rebuild this Developer Studio project. Nothing has moved in memory, so there is no need to
touch the projects for fly_db_commons.dll or for ADX.
Run the tests again. The command files are:
| Moving forward | x.int |
| Moving in a circle | circle.int |
| Tilting | tilt_m50.int |
| Climbing | climb.int |
The results are tabulated below.
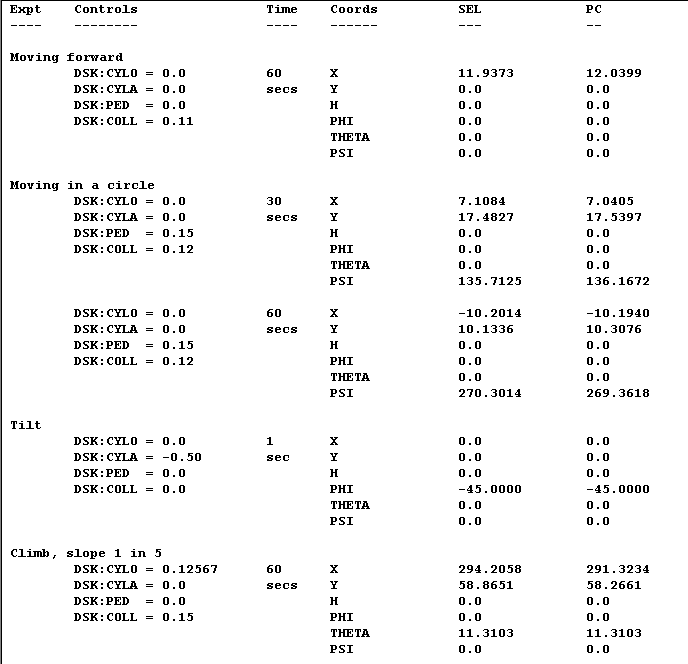
We have a successful migration!
And thank you for taking the time to follow the tutorial.
|
|
- Are these the only problems I am likely to encounter in Gould-SEL Migration?
No. You may also find, at least:
- REAL*4 and REAL*8 arguments passed interchangeably, because the Gould-SEL
number format allows this with no worse side effects than a loss of precision. The
code will not work with IEEE numbers! WinFPT can correct them automatically - see
Software Engineering | Arguments.
- CASE statements, which are not supported by some Fortran 77 systems. WinFPT
can convert them to IF-THEN-ELSE chains - see Software Engineering | Migration.
- Multiple assignments (e,g, I=J=K=0). WinFPT can split these for Fortran 77
compilers which do not support them - see Software Engineering | Migration.
- Automatic alignment, leaving spaces in COMMON blocks. The target compiler may
behave differently. Set the flags Analyse Code | Align objects in COMMON
blocks and COMMON alignment granularity 4 bytes. WinFPT reports any spaces
in the COMMONs.
- Embedded assembler code. WinFPT marks the code and can comment it out - see
Software Engineering | Migration. At present you have to translate it yourself.
- Jumps from outside a DO loop to the terminating label. WinFPT can split the labels
so that the jump goes round the loop as intended - see Software Engineering |
Migration.
- Internal subroutines and functions with a syntax slightly different from that of Fortran
90. WinFPT can analyse the code but at present (FPT version 3.4-r) it will not
convert it. This is scheduled for a future release.
- Can we set up a script to automate the translation from Gould-SEL?
Yes we can. The script gould_sel_to_win32.fsp in the main
WinFPT directory carries out most of the changes automatically. We have stepped through this tutorial in
detail in order to make clear what is going on.
- Can we automate translation of Gould-SEL assembler?
Not at the time of writing, but we expect to have this facility for some instructions by the
end of 2004.
- Can we share COMMON blocks under Linux?
This depends on the compiler used. Absoft have published a mechanism for their
systems. We have yet to do this under g77.
| | |
|
|
Copyright ©1995 to 2015 Software Validation Ltd. All rights reserved. |
|
|

